No wonder laptop screens turning off after some inactivity comes quite in handy to help save battery and prevent intruders from accessing the screen.
However, not every user enjoys this feature, especially when you often walk away from the laptop during work, watch videos, or listen to podcasts all day.
You can keep the laptop screen on longer by resetting the “Turn Off the Display” in the Power Option (Windows 10/11) and adjusting the screen time-out slider under System Preferences > Battery on Mac devices.
There are more options to keep the laptop screen on longer for different durations, so you need not keep logging in every few minutes.
Alternatively, you can also reset the sleep time of your laptop to keep it awake with lids closed.
Read on to learn step-by-step instructions to adjust your laptop screen duration.
Table of Contents Show
How to Keep Laptop Screen on for Longer?
Screen blackout after a few minutes of inactivity can be a nuisance, primarily when you work around the laptop all day.
The good news is that you can avoid tinkering with the mouse or clicking buttons to keep your screen on.
Here is how you can adjust your screen time-out on different OS devices.
A. Windows 10
Windows OS boasts many advanced features and shortcuts, but one to adjust your screen blackout.
Here are some in-hand instructions to keep the screen on longer in Windows 10.
1. Using the Settings
It is the most in-handy, often the most opted, feature to adjust the screen timeout on Windows 10.
- Tap on the Windows logo to locate the “Settings” icon. Alternatively, right-click on the Windows logo to find Settings.
- Type “power” in the search box to click Personalization to open Power & Sleep Settings.
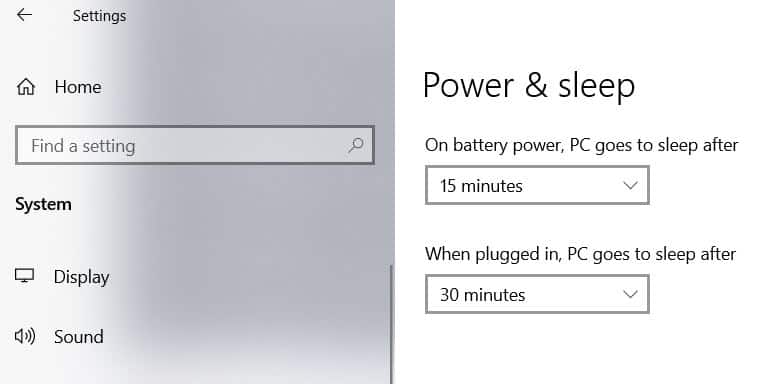
- Choose the screen timeout option for both “On Battery Power” and “When Plugged In.”
- You can choose different durations between 5 minutes to 5 hours.
- Otherwise, click on Never if you do not want any screen timeouts.

2. Using the Control Panel
An old-school method allows you to adjust the screen timeout using the Control Panel.
- Tap on Windows and type in “Control Panel.”
- Click on the Control Panel icon to open the interface.
- Type in “Turn off display” in the search bar at the top-right corner; otherwise, click on the Power Options button to open power settings.
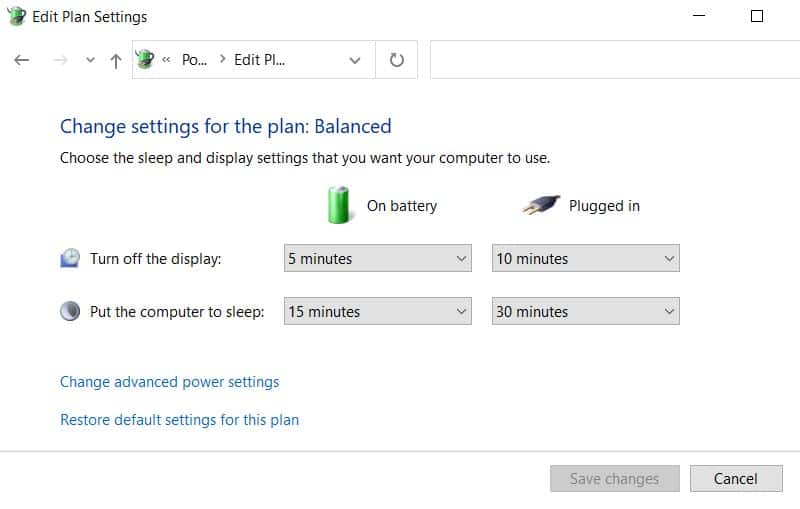
- Click on the feature “Choose when to turn off display.”
- It will open a similar interface as previously shown, where you can choose the screen timeout option when using batter or plugged in.
- Similarly, you can choose any duration between 5 minutes to 5 hours or Never.
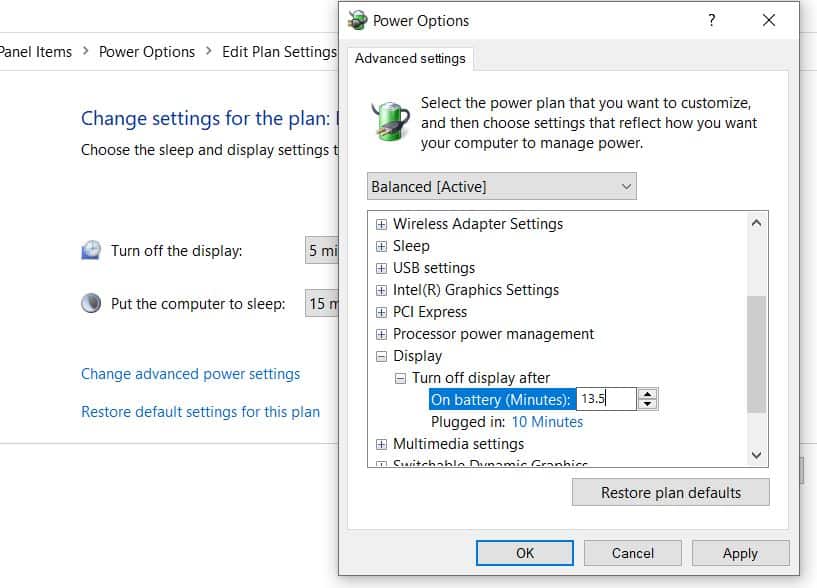
Alternatively, you can adjust the screen timeout using Advanced Settings to insert a custom duration.
- Click on “Change advanced power settings” and expand the Display section.
- Tap on the duration to insert your number, such as 7 minutes, 13.5 minutes, etc.
3. Using the Command Prompt
Although rare, this option may be handy when you cannot access Windows Settings and Control Panel.
Let us say it is the shortcut of shortcuts to adjust the screen timeout.
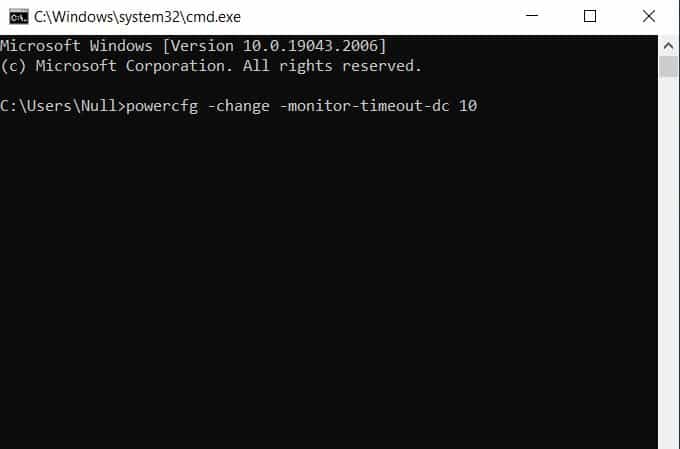
- Press Windows+R, type in “cmd,” and press enter.
- Otherwise, click on Windows and type “command prompt” to open the Command Prompt.
- Type in the following command when your device is running on battery mode “powercfg -change -monitor-timeout-dc x”
- Type in the following command when your device is plugged in “powercfg – change -monitor-timeout-ac x”
- Do not forget to replace the “x” with an appropriate timeout number or minutes, such as 5, 10, or20.
2. Mac Devices
This option will come in handy to specify sleep and wake settings if you own a mac laptop or desktop.
1. Mac Notebook
- Choose Apple Menu > System Preferences and click Battery.
- Click Battery and drag the “Turn display off after” to an appropriate duration while on Battery mode.
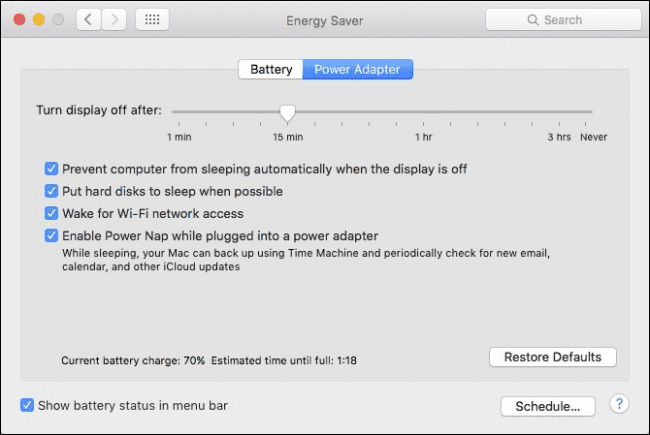
- Otherwise, click on Power Adapter and drag the “Turn display off after” slider while plugged in, or choose “Never” to keep it turned on.
2. Mac Desktop
- Choose Apple Menu > System Preferences and click Energy Saver.
- Drag the “Turn display off after” slider to an appropriate duration or choose “Never” to keep it turned on all the time.
Voila! You are all set.
How to Keep Laptop Stay Awake Without Using Mouse?
Would it not be annoying when your computer screen goes off while watching a video or making a presentation?
Windows screen is not yet designed to monitor screen activity, especially when watching the video without full-screen mode or running it in the background.
The good news is that many hacks will allow you to keep your screen on without using a mouse or keyboard.
You can install many third-party apps to tweak the screen timeout, some of which are the following.
| Tools | Specification |
|---|---|
| Mouse Jiggler | It imitates mouse input to keep your computer awake as long as you want. Do not forget to enable Zen jiggle mode to keep the pointer invisible or in the background. |
| Coffee | The name suits the app as it keeps your screen awake for longer duration. Instead of moving mouse it hits F15 key in the background simulatenously. |
| Caffeine Software | Caffeine software imitates Coffee by stimulating an F15 key once every 59 seconds to keep the screen awake. |
| Insomnia | Turning on the app will keep the screen off but keeps the compter on so you can access it anytime. |
| Caffeinated | It keeps your computer from going into sleep mode by choosing the duration from 5 min to 5 hours or indefinitely. |
How to Keep Laptop Awake With Lids Closed?
Keeping your laptop awake even when the lid is closed, especially when listening to music or audiobooks, may seem like a fairytale, but not anymore.
A quick hack allows you to keep your Windows 10 device active.
- Click on Windows to navigate to Settings.
- Go to System > Power & Sleep > Additional power settings.
- Next, tap on “Choose what closing the lid does” from the left-hand side.
- Choose “do nothing” for both On Battery and Plugged in modes.
- Do not forget to click “Save changes” before exiting.

Similarly, you can keep your mac device active when the lid is closed.
- Click the Apple icon and select System Preferences to choose Battery.
- Select the Power Adapter and move the slider under “Turn display off after” to Never.
- Do not forget to check “Prevent your Mac from automatically sleeping when the display is off” to keep it active at all times.
Frequently Asked Questions
Should I Leave the Laptop Screen on All Night?
It is perfectly okay to leave your laptop screen on all night, but it is better to turn it off to save electricity bills.
The laptop screens are backlit by fine fluorescent or LED tubes that will consume power if you keep them on.
In addition, the more you keep it on, the shorter its lifespan will be.
If you want to know if you should turn off the wireless mouse, read this article.
What should I do about my Laptop Going to Sleep?
It is natural for the laptop to go to sleep after the duration of inactivity.
For Windows 10 and 11, check the settings to adjust the sleep time, so you need not keep logging always.
- Click on Windows and Type in Power & Sleep.
- Navigate to Sleep and choose “Never” for On Battery Power and When Plugged in Mode.
Why does Screen Timeout not Work in Windows 10?
Sometimes, some security apps and glitches may prevent setting up screen timeout in Windows 10 or 11.
In such a case, you can choose to adjust the screen timeout using the Command Prompt manually.
- Press Windows+R, type in “cmd,” and press enter.
- Type in the following command when your device is running on battery mode “powercfg -change -monitor-timeout-dc x”
- Type in the following command when your device is plugged in “powercfg – change -monitor-timeout-ac x”
- Replace the “x” with an appropriate timeout number in minutes.
Final Verdict
Setting up a laptop screen to turn off after some inactivity is a handy feature to save battery life and extend the screen’s lifespan.
However, you can always extend the screen timeout or set it indefinitely if you do not find this option so helpful.
Follow this guide to adjust your laptop’s screen timeout for different devices and settings.
Let us know in the comments if any solutions worked for you.
Related Article: Find Out Quick Tips & Hacks About Laptops