Did you recently discover that your laptop’s power button is faulty, but you may need to turn it on frequently?
Do not worry if the power button stops working; you can jumpstart your device instantly using many reliable methods.
Table of Contents Show
Can You Setup An External Power Button For the Laptop?
Setting up an external laptop power button never crosses your mind because you never needed one until you badly needed one.
Like any electronic device, a laptop is likely to encounter a technical glitch at some point in time, including faulty power buttons.
In fact, witnessing the faulty power button is more likely due to these reasons.
| Causes | Specification |
|---|---|
| Foreign particles | Lodging of foreign particles like dust, dirt, pollen, lint, microplastic, etc. inside the switch |
| Faulty connection | An electrical problem with the connector preventing the switch from completing a circuit. |
| Damaged components | It is a hardware problem resulting from damaged parts, accidents, breakage, etc. |
| Hardware Issues | Although a hardware problem, it mostly occurs from constant wearing of the device |
| Software Issue | Power management software glitch preventing power consumption optimization |
A faulty power supply, battery, RAM, motherboard, or video card may cause power switch problems.

However, the cause of the faulty power switch may require extensive troubleshooting.
Therefore, you must figure out how to go around the conventional power switch to get by until you can fix the faulty power switch.
Luckily, there is more than one method to bypass a faulty power button.
Fortunately, these methods only require minimal computing knowledge about BIOS (basic input/output system) setup, keyboard configuration, and power management, which are accessible to novice laptop users.
How To Setup External Power Button For Laptop?
Setting up an external power button will be handy when your laptop encounters a problem.
Therefore, you should care to set up any of these methods beforehand.
1. Using an External Keyboard
Let us start with the quickest and most accessible method to power the laptop without the power switch.
However, you must enable this feature even before you experience a power button issue.
It involves setting up a keyboard shortcut using BIOS, a firmware stored in the memory chip on the motherboard.
Follow these steps to set up an external power button using an external keyboard,
- Boot the system (restart) and press “F2,” “F10,” or “DEL” when it opens to access the BIOS.
- Navigate to Power management and choose Power on by keyboard.
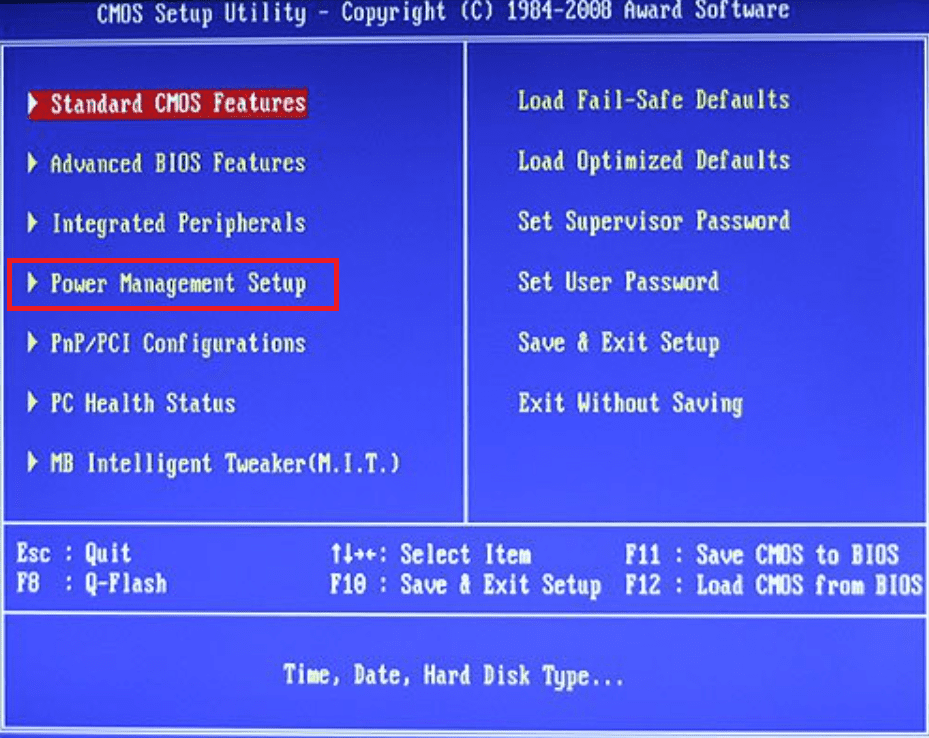
- Shut down your laptop to check if BIOS was properly enabled.
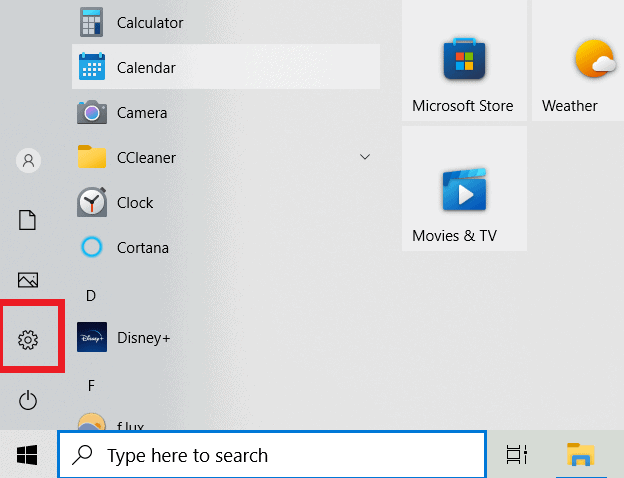
Here is how to set up a keyboard shortcut on Windows 10/11 if you wish to avoid restarting your device.
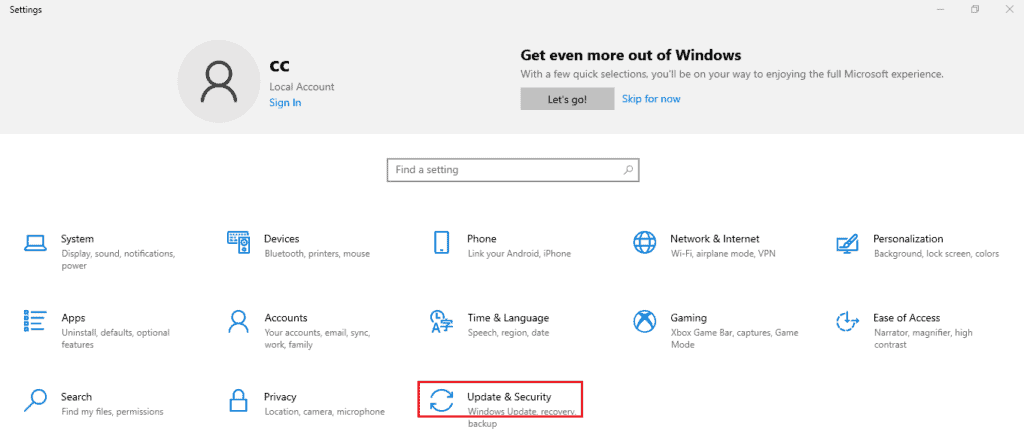
- Click on Windows and choose Settings.
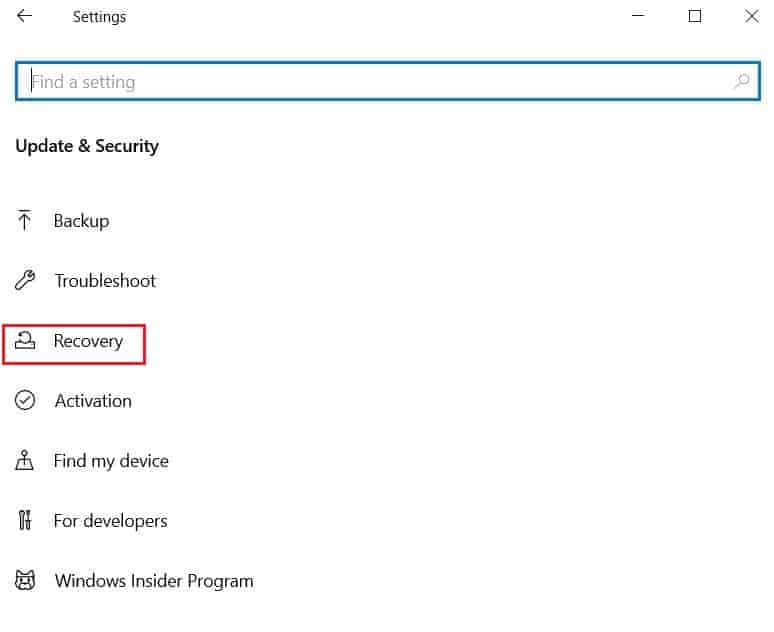
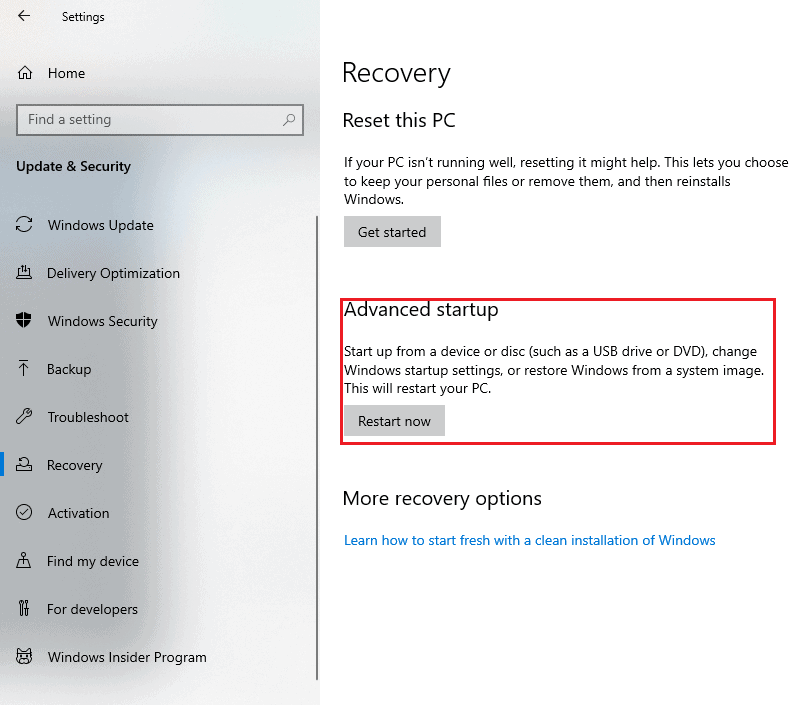
- Navigate to Update & Security > Recovery.
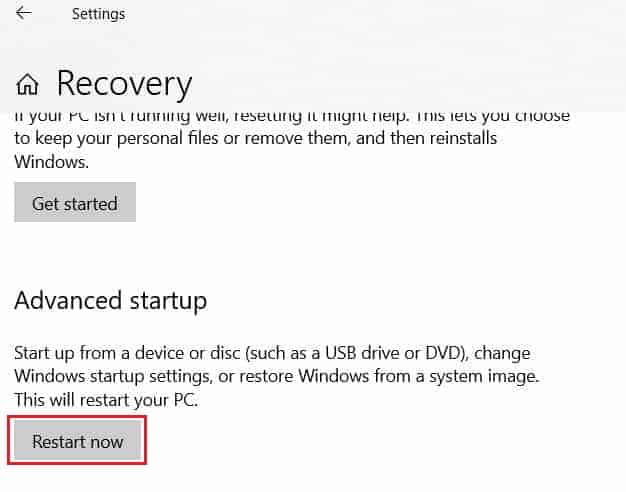
- Select Restart Now under Advanced Setup to open a new window.
- Choose to Troubleshoot > Advanced Options > Power Management/ACPI Management.

- Check the setting “Power on by Keyboard” or “Wake on Keyboard” and use +/- to enable the option.
- Select the key you wish to power on the laptop.
2. Using Wake-on-LAN Function
Enabling Wake-0n-LAN is another handy method to turn on your device in an emergency.
Here is how you can enable this feature.
- Click Windows and choose Settings.
- Navigate to Update & Security > Recovery.
- Select Restart Now under Advanced Setup to open a new window.
- Choose to Troubleshoot > Advanced Options > Power Management/ACPI Management.
- Check the setting “Power on LAN” or “Wake on LAN” and use +/- to enable the option.
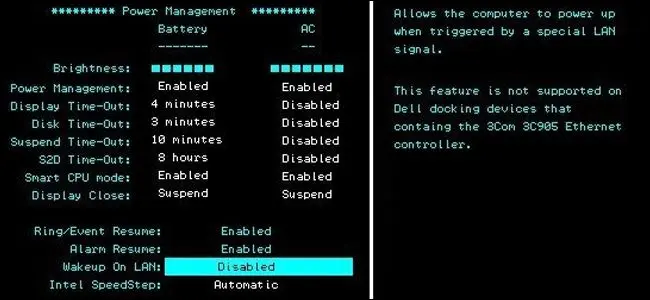
- Select the key you wish to power on the laptop.
Alternatively, you can configure the Network Card.
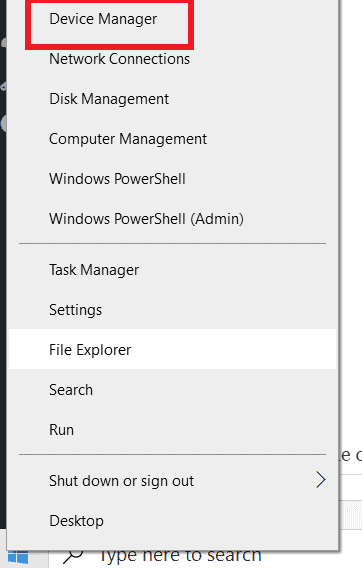
- Right-click on Windows and select Device Manager > Network Adapters.
- Right-click the menu and choose Properties > Power Management.
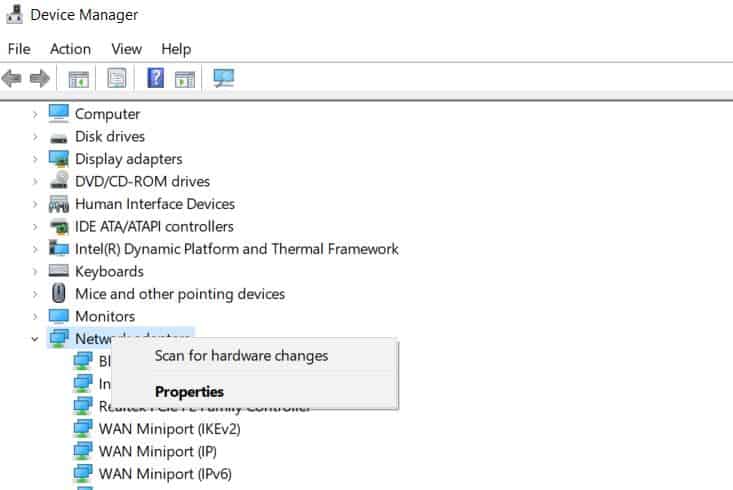
- Tick the option “Allow this device to wake the computer.”
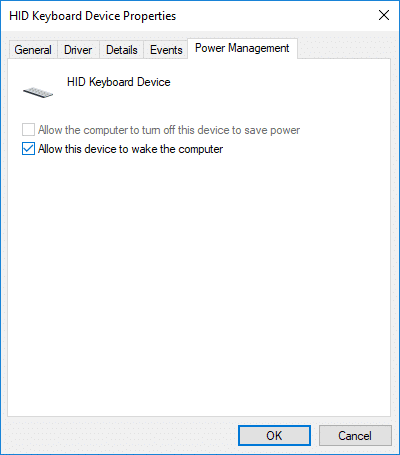
- Shut down the laptop and check whether this method works.
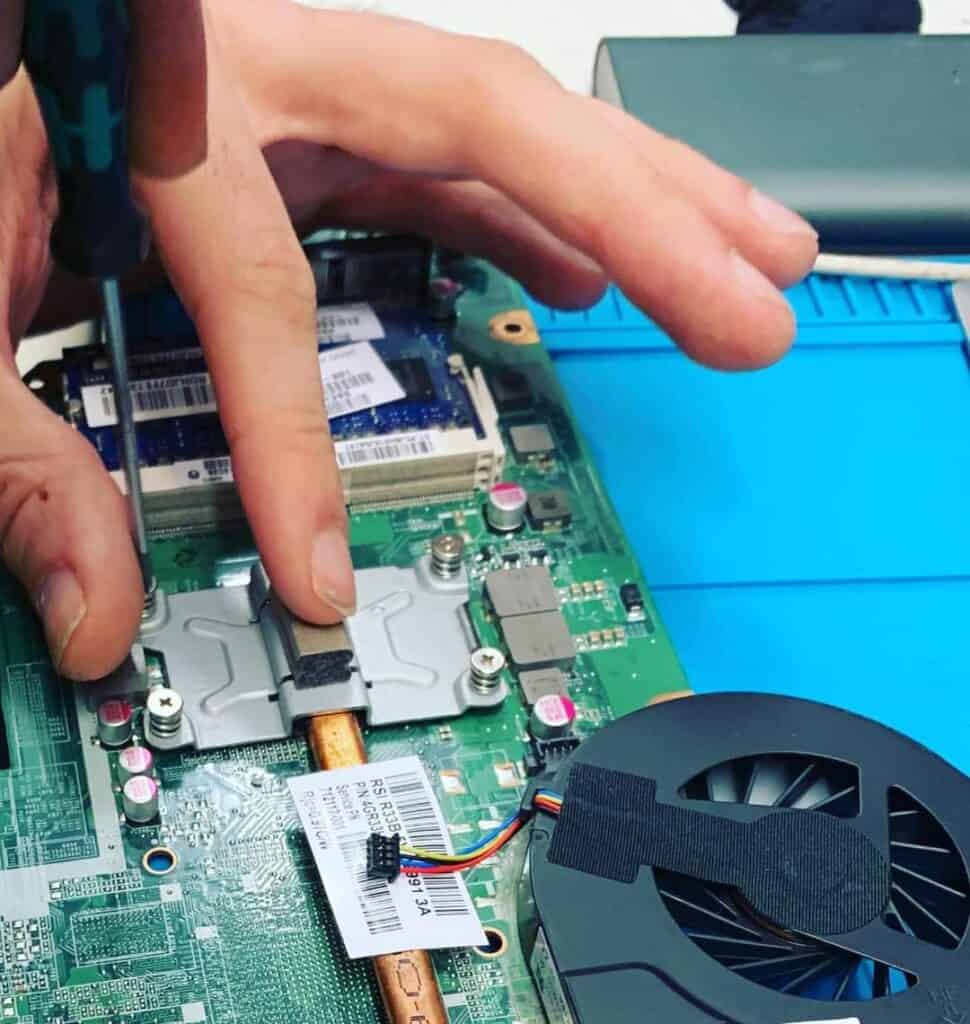
3. Jumping the Motherboard
You may find this option more in-handy if you are a hardware geek.
Jumping the motherboard is a quick option to power on the device, but doing it every time can seriously damage the motherboard and chassis.
Here is what you have to do.
- Start with unplugging the charging cable from the laptop.
- Unscrew the laptop case and locate the power button.
- Next, remove the button located over the power switch.
- You will find 3 to 6 pins under the power button, which needs a jump.
- Use a conducting tool like a metal screwdriver to short-circuit pins 1 and 3.
- Wait for your laptop to turn on.
It is best to try this method with the assistance of a technician because it can damage your motherboard and laptop chassis if done incorrectly.
In such a case, you might have to upgrade your laptop’s motherboard or get a new laptop.
4. Clock Battery Method (Cold-start)
Also known as cold-start, configuring the clock battery method will quickly power your laptop.
However, it will require expertise and a lot of caution.
Follow these steps to configure the clock battery method.
- Start by unscrewing the laptop’s bottom cover using the appropriate screwdriver.
- Next, disconnect the battery cable connecting to the motherboard.
- Next, remove the clock or CMOS battery from the motherboard by pressing the clip or tab.
- Now, connect the battery cable to the motherboard to turn it on.
5. Using a Wall Socket
You can jumpstart your laptop by directly powering the device from the wall socket.
However, this is quite risky and may require keeping the laptop cover open all the time.
- Start by unscrewing the laptop’s bottom cover using the appropriate screwdriver.
- Next, disconnect the battery cable connecting to the motherboard.
- Instead of removing the clock battery, like previously mentioned, connect the laptop charger to the device.
- It will turn your device on immediately.
6. Configuring Laptop Lid Action
It is quite a unique approach to powering the device when all other methods fail.
Here is how you can power your device when instantly opening the lid.
- Restart your laptop and press the key “F2,” “F10,” or “DEL” to access the BIOS.
- Navigate to Power Management or Power Settings.
- Next, enable the “Power on with Open Lid” and save the settings.
Conclusion
These options will be handy if you have ever had a problem with powering your laptop using the power switch.
However, enable one of these methods immediately to stop worrying about this problem.
Let us know in the comments which methods worked for you well.