In Alan Wake 2, players can find various stashes in Bright Falls that contain various loot in them.
Furthermore, certain stashes contain items that can help them progress through the game more easily.
This article discusses the Bright Falls stash and their location in Alan Wake 2.
Table of Contents Show
What Are Cult Stashes In Alan Wake 2?
Cult stashes are various chests in the game that can contain different items inside them.
You can find these stashes in various areas of the game which contain loot to help them progress.
However, if you want to access the stashes, there are specific mechanics that you must interact with.
These mechanics usually are various codes, equations, and sometimes just keys you must decipher or find.
Thus, whenever you find a new cult stash, you must first learn about the requirements to access the stash.
Location Of Cult Stash In Bright Falls Alan Wake 2
In Alan Wake 2, you can find multiple stashes in the same area.
Thus, this can be an excellent method to not only explore the various areas of the game but also get some great loot.
Here is a list of locations of the cult stash in Bright Falls in Alan Wake 2:
1. Stash 1
You can find the first stash right behind the Sheriff’s station in Bright Falls.
Likewise, you must first head southeast of the Sheriff’s station in Bright Falls.
Here, you will find the stash inside a small fenced-in yard.
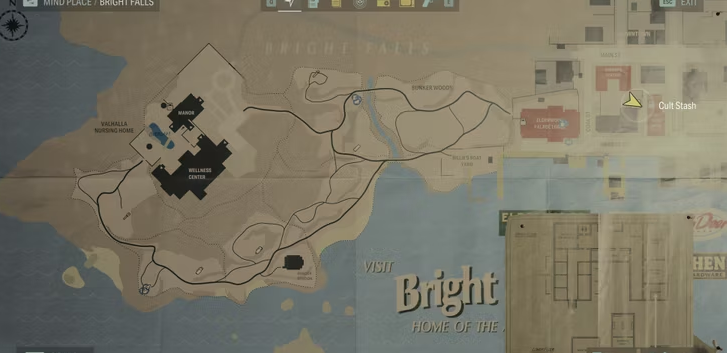
You must interact with the Work log attached to the stash to complete the riddle for the stash.
However, if you do not want to go through the hassle of solving the riddle, the solution to the riddle is below.
2. Stash 2
The second stash is near the location of the first stash; all you need to do is head to the Sheriff’s Station.
You will find the stash in the Evidence Room in the basement of the Sheriff’s Station.
To gain access to the evidence room, you must obtain the Bolt Cutter.
Correspondingly, after you obtain the bolt cutter, you can easily access the area.
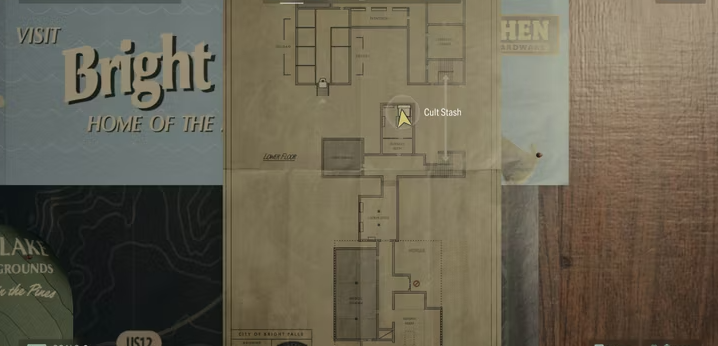
After you find the stash, you will see a puzzle to gain access to the stash.
The clue contains lines and polygons, and you can decipher the combination for the stash using the line on the clue.
3. Stash 3
You can find the third stash inside a small storage building on the pier southeast of the Elderwoord Palace Lodge.
Similarly, you must obtain the Boltcutter to cut the lock to the gate of the building to access the small storage.

The stash requires you to input a lock combination to access it.
The clues to the lock combination are all around the blockades surrounding the pier.
After you get all the combinations’ numbers, you must input the correct order to unlock the stash.
4. Stash 4
You can find the fourth stash in an Abandoned truck outside Bright Falls.
Furthermore, the area is east of Valhalla Nursing Home where you will find an abandoned pickup truck.
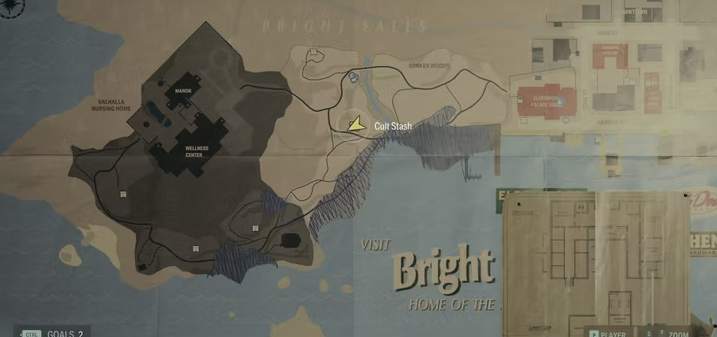
You can find the stash in the bed of a pickup truck. After you find the stash, the clue to opening the stash is a tricky match riddle.
5. Stash 5
The fifth stash is in the ranger’s cabin in the forest outside Bright Falls.
You must first reach the woods southeast of the Wellness Center and northwest of the Ranger Station.
After heading that way, you will come across a raised area.
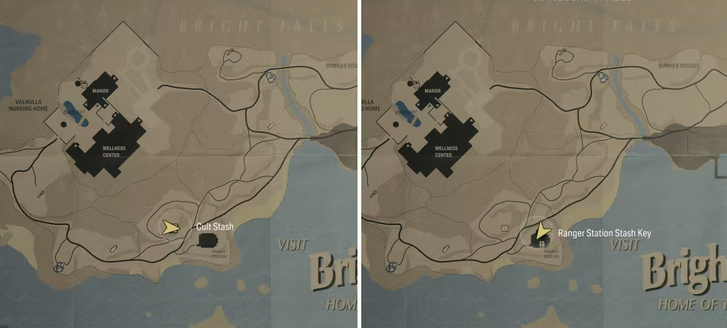
There are three Taken in the area, thus, you must be vigilant about them.
You must find a key to open the stash. The clue is on a picture in the area where Santa Claus is climbing the chimney, and the arrow is pointing towards the Chimney.
6. Stash 6
The sixth stash is next to the White hauling truck outside the Elderwood Palace lodge.
Furthermore, unlike other stashes, the lock for the stash is a Memory lock.
Thus, you must simply remember the pattern of the lights to the lock to unlock the stash.
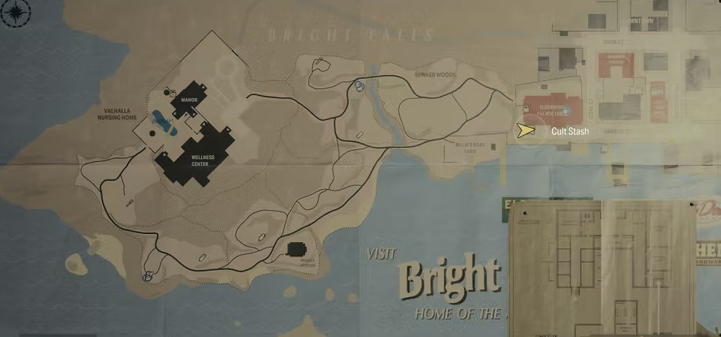
7. Stash 7
The seventh stash is northwest of the Break Room, west of Bunker Woods in Watery.
Similar to the previous stash, this one is also a form of Memory lock.
You must input the sequence of the lights that appear after they examine it.
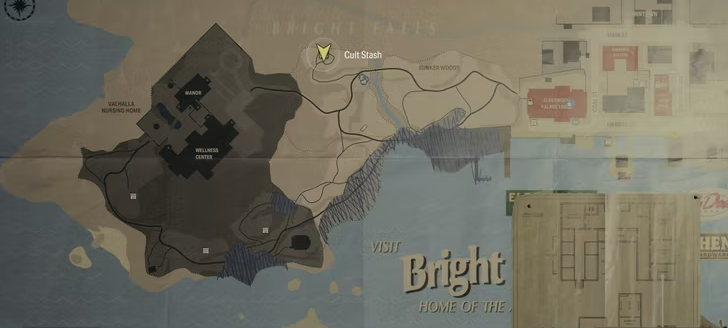
8. Stash 8
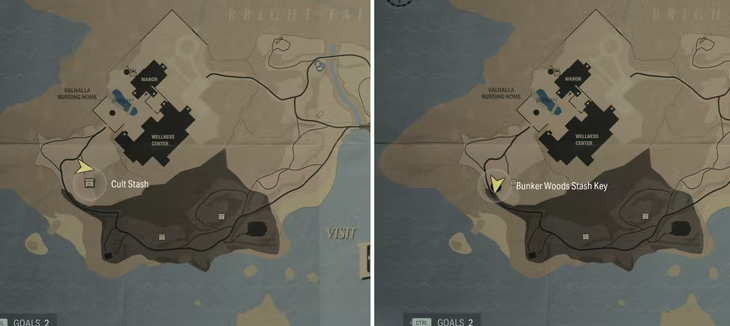
You can find the eighth stash in the woods southwest of Valhalla Nursing Home.
After entering the area, right off the beaten path, you will notice yellow arrow trees.
Then, if you open their flashlight, it will lead them to the stash.
You will find the stash behind a large rock with arrows painted on it.
However, you must find the key to access the stash.
Moreover, you can find the key near a rock with white arrows pointing towards it.
9. Stash 9
The last stash in Bright Falls is the woods south of the Wellness center and northeast of the Break Room.
After you reach the area, you will notice some yellow arrows on the trees.
You can activate your flashlight to show you the path to the stash. You will find the stash near the tree in the area.
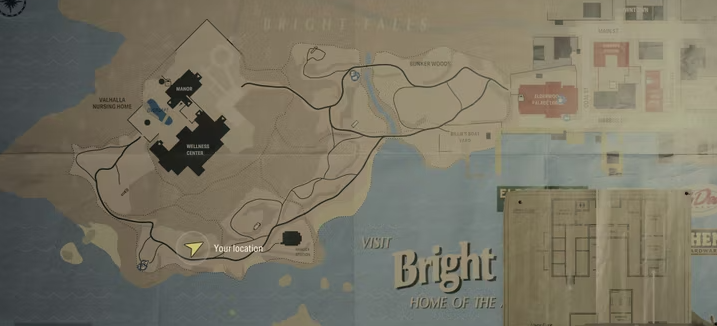
To open the stash, you must complete a puzzle with various symbols.
You can find the correct symbols by exploring the area and applying them to the stash lock.
The Bottom Line
In Bright Falls, you can find a total of nine stashes that can contain supplies and even items for later stages of the game.
Thus, it is a great way to stock up on various supplies and progress the story.
Hopefully, this article can guide you in finding all the stashes in Bright Falls in Alan Wake 2.
